Pages

Showing posts with label Tips For a Better Blogger. Show all posts

How to Get a Blog Rating

Instructions

  1. If you don't already have an account, go to www.blogged.com and click the "Sign-up" link. You will be asked to provide some basic information to start a free account.

  2. Click "Submit Your Blog" and enter the information for your blog. Make sure you choose an appropriate category for your blog and include as many tags as possible. Tags tell your readers what the blog is about. For instance, a human resources blog may include tags like "Careers," "Jobs," "Employment," and/or "Benefits."
      3.  Receive an editor's review of your blog. Show this rating on your blog by clicking the "Add   
          Widgets" button. To choose the widget you like best, copy and paste the code provided into your 
           blog software's    widget/text box.

      4.  Make your site available to other users. Other members of the Blogged.com community can now
           review your site. The more you participate in the community and promote your blog, the more
           reviews you will receive.


Tips & Warnings

  • To get a greater response to your blog, visit other blogs listed on the Blogged.com website. If you review another blog, the writer may be more likely to review yours in return.
  • Thank the users who rate your blog.
  • If you rate other blogs fairly, they will rate yours fairly in turn.


How to Find a Blog Listed in Blogwise

Instructions


  • 1  Visit Blogwise.

  • 2  Locate the text box in the center of Blogwise's homepage labeled "Search blogs listed in Blogwise"                 and type in a word or two to describe your topic of interest. You can also type in an exact phrase                 or a series of words.

  • 3  Click on "Search" and you'll receive the first page of your results.


  •  4  Click on either the blue hyperlink or the thumbnail picture of a blog's homepage to visit that blog.


  • Tips & Warnings

    • Be as specific as possible when typing in search words. For example, if you type in "recipe beef," your results list will be much longer than if you type "recipe beef stew."
    • You can see a complete alphabetical list of all Blogwise blogs grouped by keyword if you click on the blue "Keyword" box under "List Blogs By" at the top of the Blogwise homepage.
    • You can see a complete list of all Blogwise blogs sorted by country of origin by clicking on the blue "Country" box under "List Blogs By" at the top of the Blogwise homepage.

    How to Find Free Content for My Blog

    A blog is a Web site where entries are made in journal style. Blogs usually provide commentary or news on a particular subject.
     A blog usually combines text, images, links to other blogs (such as RSS Feeds), Web pages and other media related to the topic.

    Instructions


  • 1  Use your favorite search engine such as Google, Yahoo, MSN, etc.

  •  2  Enter the text in the field provided (Example: free articles for my blog, free blog articles, etc.).


  • 3 After the search engine has finished popualting the results, so start with the first link.
     

  •   4 If you do not find what you are looking for, select the back button and select the next link.Continue           until you find what you need.

  •  5 Once you've found the content you need, simply use the copy/paste method and enter the HTML code      in the spaces provided on your Web site.                                          
  • Tips & Warnings

    •   Use recommended sites.
    •   Look for high traffic content. 
    •   Find relative content.
    •   Read the license and user agreements before using any service. 
    •   Do not give out personal information unless required and you trust the site.


  •  

    10 Tips to Increase Blog Traffic

     10 Tips to Increase Blog Traffic

    1. Write Well and Write Often

    Frequently updating your blog with useful content is the first step to building your blog’s audience. The content you write is what will keep readers coming back for more. Make sure you have something meaningful to say to them and say it often to maintain their interest and keep them loyal.
    Furthermore, post frequently to increase the number of chances you have for your blog’s content to be noticed by search engines such as Google or Technorati.


    2. Submit Your Blog to Search Engines


    Get on the radar screen for the popular search engines such as Google and Yahoo! bysubmitting your blog’s URL to them. Most search engines provide a ‘Submit’ link (or something similar) to notify the search engine of your new blog, so those search engines will crawl it and include your pages in their results.
    It’s important to understand that simply submitting your blog to search engines doesn’t mean your pages will appear at the top of a Google search results screen, but at least your blog will be included and will have the chance of being picked up by a search engine.


    3. Use and Update Your Blogroll

    By adding links to sites you like in your blogroll, the owners of those blogs will find your blog and will be likely to add a reciprocal link in their blogrolls. It’s an easy way to get the link to your blog in front of many readers on other blogs. The hope is that some of those readers will click on the link to your blog on the other blogs’ blogrolls and find your content interesting and enjoyable turning them into loyal readers.

    6 Simple Ways to Attract Advertisers to Your Blog

    Generally for an individual, the purpose of creating a blog starts as a hobby and after gaining some publicity and readers that hobby converts into easy money making method. In our online world, blogging is rising very high day by day. Through blogging, one can earn a lot of money by advertising in his blog, by placing paid links and many other methods. So the required thing is that how to attract the right kind of advertisers to your blog to earn money by placing their ads to the blog. This is the major source of generating the huge amount of revenue to the bloggers.
    Let us discuss six simple and easy ways to attract advertisers to your blog:

    Set a Banner

    This is the first step you have to take – place a banner “Advertise with us” on your site or blog that shows your interest in accepting the ads for your blog. Top Menu bas or side bar is the best option to place banner. It should be clearly visible to any visitor coming to your site or blog.

    Create an Individual Advertising Page

    Try to create an individual advertisement page for detailed information. If any visitor is interested to place his ads on your site he can easily get all the information about how to contact, how to submit, advertisement rates, mode of payment etc from that page. Then only the true advertisers come to you to place their ads. So it saves your time also. You can also add the credibility, ranking information in that page like: alexa rank, page rank, domain authority, page authority of your blog.

    Add your Comment Read more 10 Easy Ways To Monetize Your Blog Without Alarming Your Readers

    Making money blogging is one goal that every blogger is aspiring to achieve and as I have observed, it has been the question of every person to a “professional blogger” is “how do you make money from blogging?”. To me, it is okay for you to ask that question but do not have it in mind that it is the only way to make money because one of the things that will lead to the getting of that money is when you use more than one way to get money to their blog. This way is a very effective way to get money online as long as the web stays and there is always a possibility that such business will work out fine.
    So, with all these said, I will present to you the 20 easy ways to make money from your blog and I advice that you use them to your own advantage.
    1. The first thing you need to know is to sell your Ads: wait a minute! Speaking of selling, I do not mean you should pester your subscribers or visitors with your products because you want to sell them by all means. When you feel your traffic rate is increasing, the step to take is to sell your won Ads and be sure to set the amount wisely.
    2. If you feel it is impossible to sell your Ads on your own, you can join an Ad Network. This will make it easy for you to manage your sales and also attract more traffic to your blog.

    How to Add Social Media Icons & Blog Buttons to your Website

    One of the most important elements to include on any website is a set of branded social media icons.
    Your icon set can include links to your RSS or email subscription options, Twitter, Facebook, YouTube, LinkedIn, Instragram, StumbleUpon, Flickr, etc. Basically, wherever you have active accounts, including a linked social media icon helps readers and customers easily find and follow you there.

    How Do I Add Social Media Icons to my Website?

    1. The first step in adding social media icons to your website or blog is to search for and choose a collection that you like. Sites like HandyCons, Web Designer Ledger, Web Designer Depot and Icon Dock offer free social media icon collections. You also can ask a designer to create custom icons to match your current website design.
    2. Once you decide on a set of icons that you like, download the image file(s).
    3. Upload your files to a site like Photobucket or your WordPress media library.
    4. Locate the image URLs of your new icons before advancing to the next step. You’ll need to include the URLs for each social media icon you plan to add to your site, to some code in a text widget in your sidebar or header.

    How Do I Find my Image URL?

    If you store your images on Photobucket, you can find your image location URL by clicking “Share” when your mouse is hovering over your image, and then the ”Get Link Code” tab.
    The link to copy is the “Direct link for layout pages” URL.


    For those uploading images to their WordPress library, simply navigate to and click on the image in your library, and then copy the text in the “File URL” field


    What Code do I Need for my Sidebar Widget?

    Popular blog platforms like Blogger and WordPress have text widgets that can easily be added to widgetized sidebar and footer areas. The code that needs to be added to those text widgets, whether it is for 1 social media icon or a whole collection, is this:
    social-media-icon-code
    The first part of the html code – www.YourWebsiteAddress.com – is the URL of the profile or page that you want someone to connect to. For example, we’d enter: twitter.com/collecter6 to send anyone who clicked on our Twitter icon, to our Twitter page.
    The second part of the html code – www.URLofImageLocation.com – is where you’d include the image location URL from Photobucket or your WordPress media library.
    Each social media icon that you want to add to your website needs the code above. These lines of html code can be repeated several times in 1 text widget, so if you have 4 social media profiles that you want to link to icons on your blog, repeat that code 4 times, changing your profile and image location URLs each time.
    This same code works to create badges and buttons, too. If you receive an image from an agency or brand you are working with, you can upload it to Photobucket or your WordPress media library, and follow the same steps as outlined above to turn that image into a button to add to your sidebar or post.

    Top 5 Video Apps for Bloggers

    Every blogger wishes to find out his blog attracting a larger audience. However, this cannot be achieved without doing anything. You need to deliver interesting, eye-catching content to stand out from a crowd of similar blogs. No matter what topic you choose, so you have to fine tune your approach and develop a fresh perspective on your topic. Here video may come to the aid and become a clue how to attract more visitors to your blog.
    If you’re thinking about promoting your blog with video content, you might need some special software which handles video-related tasks, e.g. screencasting, quick editing, HTML integration, web distribution, etc. Here are five popular video apps that will come in handy for every blogger dealing with video.

    YouTube Video Editor

    YouTube is a great place to host videos which you’d like to add to your blog. Besides embed code and video promotion assistance, YouTube grants an easy video editor with which you easily modify your video no matter when it was uploaded. The features comprise video trimming, stabilization, rotation, colour and contrast normalization and diverse effects. The button “I’m Feeling Lucky” caters 1-click color correction. You can also change an audio track and save multiple editing versions, any time you may revert to the original video.

    Freemake Video Converter

    This is a Windows-based free video converting software which can be used to cope with a great variety of video-related tasks. First, the app provides a wonderful possibility to turn almost any desktop or web video into Flash FLV or SWF formats and get code for embedding together with it. So bloggers who prefer to self-host videos can easily add new video content to their blogs since the app provides a build-in video player and a comprehensive guide on video embedding. Along with this, the video converter can be used to cut off unnecessary video fragments and create stylish photo slideshows with background music.

    Wink

    Wink is a free screencasting software that perfectly suits for making demos, tutorials and animated Flash demonstrations for your blog. The tool allows you to record desktop activity with audio and  text annotations laid over. You can easily change frames order, delete unnecessary sections and add “Next/Previous”, “Go to frame” and “Go to URL” buttons for convenient video navigation. Wink outputs to Macromedia Flash SWF, standalone EXE with viewer, PDF, PostScript, HTML and some image formats. The resulted Flash file can go together with a control bar and a preloader. The app is available for Windows and latest versions of Linux OS.

    Video Watermark Factory

    This is a powerful Windows-only application to add logos and digital watermarks to video files. So you can easily brand you video creations with your blog logo and link to protect their distribution. You may impose watermark on a whole video file or a specified section, choose the right position, font, opacity, etc. The app allows users to add text or image stamps to multiple files and re-encode them to AVI, MPEG, WMV, Real Media. Watermark Factory is aslo remarkable for its video editing abilities – it lets resize, split and add effects (blur, autocontrast, old movie, etc.) to your videos. Unfortunately, there’s drag’n'drop functionality and to register the version you have to pay $49 for personal and $149 for business license.

    TubeMogul

    TubeMogul is an awesome tool for video distribution and promotion. It makes your video web-ready and lets seed it to like YouTube, Facebook, Vimeo, Dailymotion, Metacafe, Photobucket, 5min, BlipTV, etc. You can even use TubeMogul to upload your video to your FTP in the quality you specify and create RSS feeds to syndicate your video elsewhere. The app uploads video in a record time to save your time and efforts. Moreover, it provides a handy analytics tools to measure the effectiveness of a campaign, see views, viewed minutes and second-by-second engagement. You can also figure out how viewers are finding your videos and see which sites are embedding your content.

    Blogging as a Work Of Art

    Do you love writing? Do you have lots of notes around, yet you cannot get them out of the public? Well then, why don’t you just consider facing your computer, make use of your internet and start blogging? Yes, weblogs, or blogs are one of the main things these days. People had made this as a good way for their paperless journal, news, personal need and even with regards to business. Do you have any idea that blogging can help you make a lucrative tomorrow? You may not have any idea about how internet can help you and make your own name online.
    On the other hand, you might be one of those people from the second group who often ask about on how they could be a good blogger, so as on how they could write a better blog. Actually, it is not a hard thing for one to start being a blogger, as you yourself could surely enhance in the long run.
    Unluckily, not everyone is good in terms of writing blogs. They do have different and some people actually hate writing. They do have their e-commerce website or blog and they are somewhat forced to write for it. Well, if you would like to help yourself out, you don’t have to worry too much about blogging. Taking some of these tips below would surely help you out:
    • Make it a little personal- if you would like to be a good blogger, you must provide better insight as well as a touch of personal side while you are writing. The information you are offering has not to be recycled, instead, it has to be informative and fresh. Keep in mind that a blogger have to be responsive into their audience and will be easily accessible, respond upon the comments and also provide dialog, which is easy to make a good sense of.
    • Gather your personality- the personality of a blogger is definitely a big key, when talking about having your audience to like or hate you. This is actually where it gets a little tricky. You really want to be somewhere in between. You want to be hated by people, as you caused controversy and discussion among your readers, but you could also be likeable enough that those people who also hate you will come back to your blog and read more. Does it make sense, doesn’t it?
    • Be passionate- if you aren’t passionate about what you are writing about, it actually shows and your readers would truly know much about it. You must never struggle when you are writing out a post. This is for the reason that it all should come in a natural way. If this is not really the case, you are writing upon the wrong subject. You must always have fun while you are writing and do not just force yourself for doing it.
    • Post out some pictures- if you would like to have your post a little alluring and attractive to your reader’s eyes, posting pictures would surely be great. It doesn’t really need to be a photo of yourself, yet it has to be a photo, which is related to whatever type of post you have on it. However, make it sure that the photo is something great and related to what you are posting.
    • You must stay focused- if your posts is all about devices, then you should not write any about politics. Whenever you did, you are actually breaking off the rules. At some point, it may be good, as it gives your readers the chance to see what more you could write. However, you still have to remember that most of the time; your content has to match upon the title you gave for your blog. Your readers were simply attracted into your blog for the first place due to its subject. So, simply try keeping up their focus, the way in which you should be as well.
    You could really be a good blogger, and make your name renown online. However, before you consider yourself as a good and professional blogger, make it sure that you comply with those things mentioned above.

    Twimates- Get Free Facebook Likes, Twitter Followers and Web Site Hits

    Two third of internet users are now involved in social networking and twitter, facebook and youtube are one of the big companies in this industry. Companies are now spending a lot of budget in social networking sites to get access to customers. The key factor in social networking sites like Facebook and Twitter is that if you are followed by lots of real people, then you can get in touch with them for possible business opportunity.

    What is Twimates?

    Twimates is a community where different interest of people (from facebook, twitter, youtube and blogging community) follow each other to grow there social networks. The good thing is that if you are a small company or individual then you don’t need to invest to get twitter followers, facebook likes and youtube views, but you can follow others and in return you will be followed.
    For your every activity you get grains (credits) and then those grains can be used to let other users registered in twimates can follow you. The more grains you have the more followers, facebook like, website hits and youtube views you can get.


    What is New in Twimates?

    Just a few days ago i reviewed twiends a similar community to twimates. However in twimates you have 3 more benefits that you can get.
    • Increase Digg Votes
    • Get Mutual Website Hits
    • 50 free Grains per referral
    Apart from increasing your twitter followers, youtube views and facebook likes you can now increase digg votes and website hits.
    Twimates is not yet officially launched, it will be open for public on 1st June 2011. However registration is open and you have golden opportunity to get the following benefits when the website is launch.
    • 200 free grains every day for the first month
    • 100 grains per referral (Those who will register after 1st June, 2011 will get only 50 grains per referral)
    • Free premium account for the first month
    Register now and get preregistration benefits to grow your social networks faster. Twimates has potential to connect you with interested people in twitter, digg, youtube, blogging and facebook community to grow your social network.

    5 Project Management Tools That Can Help Bloggers

    These days any kind of job is labeled as a project and finer tools are available to manage such job. Such project management tools help in a good way to manage the project to meet with the project demands and complete the task in time along with timely delivery of small milestones to make the project cost viable and cost effective. Thanks to technology for such tools.
    A blogger can use these tools to streamline the task, allocate the time to achieve the blog deliverable and define the time line as it suits the project requirement and also have team members to break down the whole task of designing the blog. Content development of the blog, blog promotion and blog marketing, posting and attracting link building initiative for the blog etc.. all these are projects and the following tools can help you in managing your projects.

    Todoist

    This is one of the most used tools for project management by bloggers. The tool is capable of maintaining a to-do list for bloggers in the admin area. The list is unique for all registered users and this tool monitors the activities such as users who are logged in and displays to-do-list which belongs to them. Bloggers are able to keep the record of various tasks and information with the help of this tool.

    mGTD

    It is known as MonkeyGTD and is considered to be a robust and powerful project management tool for blogegrs. This can effectively used for blog projects. It is possible to store this tool on any of the web server so that you can access your files.

    Tom’s planner

    This is the institutive Grantt chart tool for personal use which can be used by most of the bloggers. It is capable of providing mouse-based tweaking on the work area. It is possible to have a glance at the product as it is available for free to be downloaded.

    Things

    The tool is mainly available for Mac users and has been known as one of the strongest tools for maintaining information, organizing data and linking them to calendar.

    Evernote

    This is mainly available for windows platform and is an excellent project management tool. It helps you to remember important things, save ideas, and reminders about the things you want to do in future. It works will phones and computers, and you can find you stored information easily in your account.
    Hope these tools will help you to manage your important projects in time. Feel free to share any other tool that you thing can be helpful for our readers.

    4 Tips for Keeping Up with Your Blog While Traveling

    If you are serious about your blog, you know what a time consuming activity that it can sometimes be. You have to be able to drum up new content on a fairly regular basis and you have to respond thoughtfully to your readers’ comments. You also have to take on other administrative duties like replying to emails from potential guest bloggers, as well as deciding how you are going to alter your blog design and layout to improve it in the future. With all this work going on, how are you to keep up with your blog when you go on vacation? Here are a few tips:

    Make sure that your vacation accommodations have ample and quality Internet access before you book your trip.

    This is especially important if you are leaving the country. While it’s true that the Internet has become so ubiquitous that you can get fast Internet virtually everywhere, not all hotels have wireless Internet, and some require you to pay a large fee. If you make Internet connectivity a big priority when you travel, you should be able to keep up with your blog fairly easily.

    Set aside the least busy part of your day to dedicate to working on your blog.

    Of course, vacation is vacation, and you want to take a break from your routine activities in order to reap the full benefits that going on a trip entails. Still, when you are visiting a different city or country, you often have that period of time when you aren’t doing anything except maybe watching TV at your hotel. For me, the best part of the day to work on my blog during a trip is in the early morning when my family members or friends are still asleep.

    Remember that vacations, especially to exotic destinations, can provide great material for your next blog post.

    Even if you blog about a very specific niche, you should take advantage of the experiences you encounter on your trip. They can serve as great inspiration even though you may not usually blog about your personal experiences. For example, if you blog about tech products, find out about the industry in the country you are visiting, ask a few locals, and write a blog post about what tech products are popular there.

    Always remember to set up an automatic email that lets others know you are out of town and may not respond immediately.

    Even if you have a great Internet connection where you are staying, you may be in a different time zone than the one at home, and you may also decide to go on excursion where Internet is not available. As such, don’t automatically assume that you will be able to respond to emails on a timely basis. Most email servers allow users to tweak the settings such that you can send an automatic note to anyone who sends you an email, and that way you can let them know that you will respond when time allows on your trip.
    Even when you are at home going about your daily business, keeping up with your blog can be tough. When you go on a vacation, especially a long one, you might be tempted to let it sit for too long a time. However, just as with the theater, the show must go on, so keep blogging but have a fun trip, too! Bon voyage!


    By-line: Mariana Ashley is a freelance writer who particularly enjoys writing about accredited online colleges. She loves receiving reader feedback, which can be directed to mariana.ashley031 @gmail.com.

    6 Effective Ways to Reduce Bounce Rate and Get More Targeted Traffic

    Most of the bloggers and website owners are aware that a low bounce rate is a sign of a good site or blog but for some this is all unchartered territory and questions arise as to how bounce rate affects to our blog, why we should care about it and what can we do to make it as less as possible.
    Firstly, let us understand what is meant by the word “Bounce Rate”.
    Bounce Rate
    A bounce rate is basically a method to measure the quality of the traffic that comes to your site or blog. It is the number of visitors that opens your website and leave it without viewing any other page. Through bounce rate, you can know the exact value of your blog or site. As an example, bounce rate 30% is much better than 75%. An ideal bounce rate is always less than 50%.
    Following are the six effective ways to reduce the bounce rate of your blog or site to get the targeted traffic:

    1.)  Use Relevant Keywords for your web page

    Choosing relevant keywords play an important role for targeting significant traffic. Using relevant keywords, tags and content and posting them to the appropriate pages by selecting correct categories attracts the right traffic to your site and as a result your bounce rate reduces.

    2.) Improve Your Web Page Loading Time

    Users like those websites which open instantly without taking much time to load. Although the internet speed in present times is very fast due to advanced technologies but still sometimes the websites become so heavy that no user is interested to wait the site loads fully. They just close it and move to the other site. As a result, your bounce rate increases. So you should improve your website’s loading time. If the user is viewing pages via mobile devices, it will affect the speed due to temporary network congestion or high traffic levels. And the use of multimedia, slideshows, scripts, etc also increases the page load time which ultimately increases your website’s bounce rate.

    3.) Put Quality Content to your site

    Users are attracted by good and relevant content on your site. It adds extra flavor to your site to stick the readers and also helps to build users trust on your site. Quality Content is the best way to attract huge amount of users to your site. But if your site does not have good quality content then obviously the users will move to the next site and hence, poor traffic brings higher bounce rates.

    4.) Use Navigation Structure Properly

    Properly placed navigation on your site also affects the bounce rate of your website. Properly categorized menu on your site leads to the appropriate sections of your website and this help the users to navigate your site easily to the desired page. Hence, it reduces the bounce rate of your site.

    5.) Proper and Effective Internal Linking

    Apart from navigation structure, internal linking of the web pages also affects the bounce rate. You should hyperlink your internal pages with the content of the landing page. This is called cross reference internal linking. This is also an effective way to promote your content-rich pages to increase the user’s readership and generate trust. Moreover, you can use the feature “Related Content” to achieve this. If visitors can navigate easily within the websites using internal linking, they will stay on the website which reduces bounce e rate.

    6.)  Use of right tools and features

    You can use many tools and features on your site to reduce the bounce rate of your site. These tools and features encourage the users to visit the other interested pages of your site and hence reduce your bounce rate. Following are some of those features:
    • Featured Content
    • Top Stories
    • Related Content
    • Popular Content
    • Comments
    • Feedback
    Author Bio:- Roberta Smith writes for http://www.markkia.com. She enjoys content and writing about the social sphere.


    7 Tips to Reduce Blog Loading Time

    Time is precious for each one of us. So, would you like to waste this precious time on any website that takes a lot of time to load its WebPages??? Absolutely not! Most of us would always visit sites that have great Content and have less loading time.
    Blog Loading Time is an important factor for any Blogger. You may lose visitors if they get frustrated by the time your blog takes to load its pages. Many bloggers have been tensed from the time when Google included Blog’s Loading time as a Page Ranking Factor.
    Well, if you think that your blog’s loading time is slow, then you can follow the tips given below to reduce blog loading time.

    1#  Choose the Best Web Host


    Your blog’s loading highly depends upon the type of hosting you are using. Well, go for a hosting that is popular and most used. It may cost some extra dollars; but its better then losing readers because of page loading time. So, your money is not going useless. Remember, nothing can be a substitute of a Bad Web Server.

    2# Remove Unwanted Plugins

    Plugins add a lot of burden to your Page Loading time and no one can waste such precious time. So, it is recommend to use minimum number of plugins. Only keep those that your blog really needs.

    3# Avoid Lots of Advertisement

    Advertisements eat up much Speed. So it is advised to use less Ads and Not more than 3 Ad Networks. Well, I advise you to use only one. More ads you have, the more time it takes to load the Pages of your blog.

    4# Use Caching Plugins

    Well, if you are using WordPress platform, then you can improve your site loading time using Caching Plugins. One of the most used & famous plugin is W3 Total Cache. This plugin reduces Blog Loading Time. It is useful in caching every aspect of your site and improving Server Performance.

    5# Minimum number of Images

    It is advised to use less number of images in a post as images play a major role in Blog/Page Loading time. You should use images that are in JPEG or GIF Format.

    6# Use Less Posts on Homepage

    As we all know that when visitors visit a blog, the first thing he would be seeing is the homepage. As the first impression is the last impression, you must work on your Homepage Loading Time. Use less posts on your Homepage. Well, 7-8 posts on the Homepage are sufficient.

    7# Use a Simple Theme

    Your Blog’s Loading time always depends upon the type of theme you are using. There are many WordPress as well as Blogger themes which take less loading time. Try to use this type of themes.
    TechMaish Theme is one of the popular, search engine friendly and fast loading theme, don’t forget to try it on your wordpress blog.
    What next? If you want your readers to stay on your blog, then follow the above mentioned tips to Load your blog faster.
    Share your valuable views in the comment section.
    Author Bio:- Sandipan Mukherjee is a 23 year old blogger from Durgapur(India). He is a Computer Engineer and currently pursuing MBA in Marketing. He is the owner of Crystal Articles. He loves to write articles related to Blogging, Tech and Social Media.

    7 Tips for Decreasing the Load Time of a Website

    Even the most devoted customers can get annoyed at a page that takes too long to load. By speeding up the loading time, you can ensure that your customers and potential customers will stick around long enough to make a purchase. Try these tips to make your page load faster.
    Use optimized images
    Your graphic editing program will most likely have the tools to optimize your images for web use. With just a few clicks, you can shrink your images by 80%. The quality is basically the same but with far fewer kilobytes.
    Choose static images over animations
    If you can accomplish the same thing with a static image as you would with an animated graphic, then you should choose the static image. They take considerably less time to load.
    Use thumbnails that can be clicked for a larger image
    Thumbnails are just a smaller version of your picture. Many times a larger picture is not even necessary. However, you can offer your shoppers a larger image if they click the image. Your page will load faster and the content is still there.
    Adjust your table so that your page loads gradually
    When all of your content is placed within two table tags, then your page will wait to load until every piece is ready. If you divide your content into smaller groups, then pieces will load more quickly, giving your shopper a chance to stick around for the rest.
    Place all of your images in a common file
    When you keep your images in the same file, you reduce the chances of having duplicate images. Your browser will find your image more easily, and they will load more quickly.
    Test your hosting company servers
    Some servers are just slower than others. Test yours to make sure a slow server is not your problem. If it is, you may want to make some changes.

    Limit database queries
    You don’t have control on the amount of queries and calls to a database. You can, however, limit the number of queries allowed on each page. Keep the information on your home page brief, and make it easy for customers to know where to click to find the information they need on subsequent pages. This strategy is worth it for your home page to load quickly.
    A slow loading website can mean a potential loss of customers, while a web page that loads quickly make it easier for prospects to see your information quickly and get hooked. Test the load time of your website often and from different browsers if possible to ensure that no sales are lost on a slow load time.

    Case Study: How A New Blog Achieved 100% growth in 2 Months

    Two months ago the CEO of our company asked me to take the lead on launching and growing a brand new travel blog. Flightster, is currently functioning only as a blog and will eventually become a fully functional flight booking engine within the next several months. Starting solely as a blog has shown us the tremendous power that a blog can have in building brand awareness.

    Objectives:

    • Build Brand awareness
    • Leverage social media to Connect with the Online Travel Community


    Building the Blog


    #1  Budget

    One of the biggest mistakes I’ve seen companies make is to assume that the social media is “free.” Social media should be treated just as other marketing channels are. It should have a budget allocated for it. Our industry is heavily driven by extremely high PPC costs that can get up to 6 figures a month. My boss allocated $2500 a month for me to run the Flighster blog, which is an extremely small percentage of the overall marketing budget. However, $2500.00 is a substantial budget to run a blog if you know how to stretch it.

    #2  Writers

    Putting together a team of writers was my first order of business once I was put in charge of starting the blog. Initially, I reached out to writers from other well established travel blogs in the hopes of getting them to write for Flightster. I got no responses except one letting me know that the writer had been locked into an exclusive with another popular travel blog. After that I decided to tap into my personal network. This is where the power of having my own blog became very apparent. If the person in charge of your corporate blog has his or her own blog and it has a following, put that person in charge of your company blog. The greatest asset that person brings to the table is a network of contacts with an established online presence.
    My boss gave me the go ahead to allocate $75-100 per post for contributions, so I reached out to the best writers I could find in my network. I looked at people who I had interviewed for my podcast and those whose blogs I read on a daily basis. Below are the main criteria I looked for in a team of writers:
    • Good writers with established audiences who loved them
    • Blogs with Roughly 1000 Subscribers
    • Bloggers who were very active on Twitter
    I reached out to a popular location independent blogger as my first step and I recruited the remaining writers based on his referrals, with only one exception who I hand picked after reading his blog. One simple way to look at this was “If I wouldn’t subscribe to their blog myself, then I wouldn’t hire them as a writer.”

    #3  Editorial Policy

    Prior to the launch of Flighster, I spent several months looking at many corporate blogs. When I compared them to the individual blogs I read on almost a daily basis, I noticed a major difference. Individual blogs had an interesting voice and sounded human. They were filled with comments and they kept readers coming back for more. Most company blogs sounded like a marketing brochure and they were incredibly boring. My solution was simple, a very loose editorial policy. If what made my writers popular on their own blogs was their writing, then I saw no reason to place many restrictions on them. I knew this would allow them to write the most interesting content possible.

    #4  Timeless Content

    I was given only one restriction from our CEO and that was to produce content that was timeless. You’ve heard this phrase “content is king” over and over again. By producing content that is “timeless” we could significantly increase the amount of time people spent on the site looking at our content. Timeless content is what gets shared over and over again. For many bloggers it’s not uncommon to have something popular they wrote over a year ago shared on twitter or Facebook, so I recommend companies take this same approach to content.

    Marketing the Blog


    After assembling the writing team, I started to think about the most efficient ways to market a blog. Growing my personal blog had taken over a year before it was really on anybody’s radar. With Flightster, I was determined to do this much faster so I decided to narrow my efforts down to 3 channels.

    Channel 1 : The Audiences of the Writers

    When I started the blog, I assumed that the audience that the writers brought with them would my greatest source of traffic. Part of my thought process in hiring them was that the marketing was already built into the content since I assumed their audience would follow them. As a result, we decided to sponsor the Way Below Status Quo Tour, a road trip across America where 3 bloggers were going to meet all of their readers in person. In exchange for the sponsorship, we asked for 3 posts a week on the Flightster Blog about the various destinations they were visiting. The cost was $100 per post. Given that their readers that they were meeting were also bloggers and people with an active online presence it provided yet another way for our message to spread. While it did give us a, nice initial kickstart, I knew that it was going to take a bit more to make the blog grow.

    Channel 2: Facebook

    With a budget of $2500 a month, the cost of a Facebook ad would go up very quickly and I wasn’t convinced that it would provide the most effective ROI. But I knew that a Facebook fan page would be essential at some point. So, I set up the fan page and allowed it to grow somewhat organically. The Facebook page is still a bit of a work in progress.

    Channel 3: Twitter/My Personal Network

    Given the budget I would require to get the most out of Facebook I decided to focus my efforts on Twitter. As a blogger, I noticed something about the audiences of Twitter and Facebook. They didn’t seem to have much overlap when it came to the everyday internet user. However, anybody who was a blogger seemed to be extremely active on Twitter. This was the group of people who could make a message spread. Additionally, I had my personal network of bloggers on Twitter who I have interacted with almost daily over the past several months.

    A Campaign to Hire a New Writer


    After staffing the blog with 4 writers, I decided to hire another writer. Rather than ask for writing samples and picking the one I liked best, I wanted to use the hiring process as a viral marketing tool. I asked the potential writers to do the following:
    • Write a Blog Post About Anything Travel Related on their own blog: I asked them to write on their own blogs because I knew it was something they would already be doing at least a few times a week. The thought process was to make it as as easy as possible for people to participate.
    • Link to Flighster in the Post: The goal behind this was simply to generate relevant inbound links from other travel blogs. My SEO knowledge is pretty limited to what I’ve read on various blogs, but I felt that this would also help get the word out about Fligtster among other travel bloggers.
    • Tweet the blog Post with the hashtag #FLIGHTSTER and follow us on Twitter: This allowed me to not only build a following amongst travel bloggers, but also stay engaged with all the participants throughout the course of the competition. Additionally, it proved to be a great tool for building awareness of the Flightster brand.
    • Get our Attention: In an effort to keep the engagement level with participants up, I gave them freedom to get our attention in any way they felt they could. The result was video submissions and a consistent sharing of their own content with the hashtag #Flightster.
    • Voting for the Next Fligthster: After allowing the contest to run for two weeks, we narrowed it down to 10 finalists. We then setup a poll enabling the readers to vote on their favorite writer, and encouraged the contest participants to promote their participation in the contest in order to get as many votes as possible. The result was a signficant jump in traffic.

    The thought process behind the campaign had a few components. First I wanted to kill as many birds with one stone as possible. That is why I made connecting with us in all of our channels a component of the contest. Another thing that we wanted to do was to give the participants a sense of control over their participation in the contest. Many of the various contests have winners that are chose at random, thus reducing the incentive for people to participate. The result of this kind of contest is a “what are my chances” mind set. By allowing people to gather votes to become our next writer, we put them in control. Another interesting byproduct of the contest was that we facilitated an ongoing conversation between participants. Contestants commented on each other’s blogs and followed each other on twitter. We served as a connector.

    The Results:


    Bloggers Who Participated: 24
    Finalists in the Contest: 8

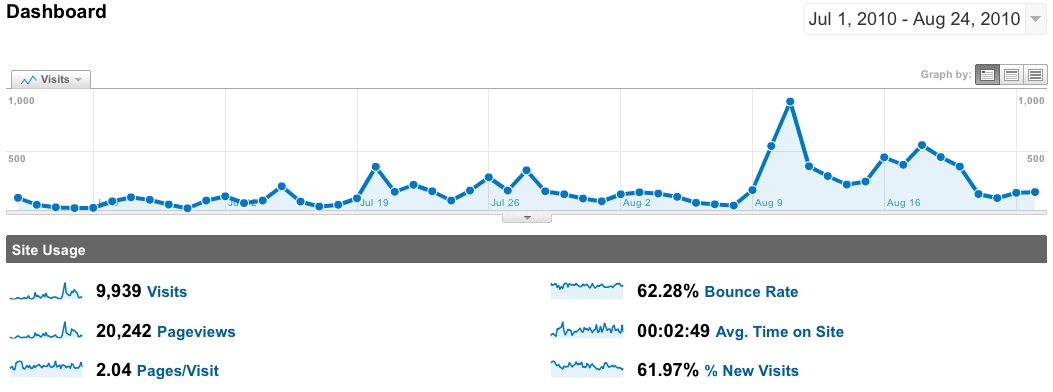
    Traffic During the Contest


    Traffic During the First 2 Months of Flightster


     As you’ll see above, the results were decent for a brand new blog that nobody had heard of prior to its launch in early July. Without a doubt the campaign to hire a writer was the most effective tool we had in our arsenal which is what caused the biggest spike in traffic. The cost of running this campaign: ZERO DOLLARS

    Lessons Learned:


    Engagement vs. Numbers:


    One of the things that might surprise some people is that this was all done with roughly 300 followers on twitter and only 130 Facebook fans. If you have thousands of followers who don’t interact with your brand, then you are really missing the point of being on Twitter. Out of the 300 followers, our engagement was focused primarily on the participants in our contest. You need followers who are actually engaged and interacting with your brand. Otherwise it’s like standing on top of a table in a crowded restaurant, wearing a ridiculous outfit and hoping people will want to talk to you. This might seem the like the slower way to grow on twitter, but it’s just slower when you start out. In the long run this approach will make you grow much, much faster. Just ask Scott Stratten, a guy who nobody knew last year and is now this years keynote speaker for Blogworld.

    The Power is in a Network:


    I can’t underscore how much my personal network played a role in this. Given that I have my own blog and a personal network, getting the word out about this contest was simply a matter of emailing all the bloggers who I had relationships with and asking them to share our post about our contest with their followers. Given that the post was about getting paid to write for a blog, it made complete sense for them to share it with their networks and I got no resistance at all. So, my advice is find out who in your company already has a network in place.

    The Tipping Point and The Rule of 150:


    A few weeks back I was listening to Malcom Gladwell’s book, the Tipping point for the second time and I came across a concept known as “The Rule of 150.” The basic idea behind this rule is simple. The highest number of social relationships we can effectively manage is 150 and it takes roughly 150 people to make an idea spread. This was the driver behind how I decided to approach building the Flightster following on Twitter and in my own personal brand. With my personal brand I have seen a significant jump in traffic and subscribers to my blog. What this all comes down to is one simple fact: Social media is building a “social” relationship with your brand.

    Now Is Your Turn…


    How do you build your blog from scratch? Does Social Media plays a big role in your blog-building plan? Share with us your story or if you have anything to ask Srinivas, do so in the comments below.


    How to Get Google’s Verified Authorship for your WordPress Blog


    I am sure that you have at the very least heard about the authorship markup that Google is pushing for lately. Whether this is a well elaborated plan to “lure” people into using Google+ or not, the fact is, they highly recommend it and regardless of whatever impact this could mean for SEO, I am guessing that it will eventually play its part and provide some advantage for users that are using it, over those who don’t. Here’s an excerpt from Othar Hansson, Software Engineer of Google.

              We know that great content comes from great authors, and we’re looking closely at ways this markup could help us highlight authors and rank search results.


    That said, and in a recent comment made by Ileane of BasicBlogTips in my weekly roundup, she mentioned that it would be nice if there was a WordPress plugin that can make all this authorship stuff less confusing. Well, I don’t blame her, because it is really quite confusing and I have spent several hours yesterday trying to figure it out for myself. While there is no WP plugin that will do the job (yet), there is a vital plugin that will you will need for this to work, specially if you have multi-authors in your blog.
    Anyway, after doing a lot of research and countless trial and errors, I finally was able to verify my authorship markup with Google. Lucky for you, if you have not done it already, I will show you exactly what I did to make this work, the easy way. By easy, I mean, no coding or editing any of your CSS or anything like that. Obviously, there are other ways to do it, but trust me, I got very frustrated yesterday, and what I will share with you today, seems to be the easiest way to get it done.
    So, this is a two part process, the first being to establish your own authorship markup and the second to configure WordPress to allow inclusion of the rel=”me” and set links for your contributors or authors in their bio. Let’s get started..
    If you made any previous attempt to make this work and did not succeed, clear everything you made and start from scratch.

    Create Your Google Author Markup

    1) This is an optional step, but Google recommends it, so :) . Make all your +1s available to the public. Go to your Google+ account profile > account overview > edit profile. Click the +1 tab and check “show this tab on your profile” and save.
    2) From the same Google+ profile (editing mode), create a link to point towards your site. Goto > edit profile > about, enter your Name (same as bio in WP) and link to your site. Make sure that you check the “this page is specifically about me” box and save. This will automatically put the “rel=me” on G+.
    3) Link to your Google profile to establish a relationship between G+ and your site. You can do this by creating a G+ button and placing it somewhere in your site (or you can create a plain text link in your footer for example). Create your G+ button here. Then place your Google+ profile URL, select image size, copy the code and paste it somewhere where it will be present in all of your pages


     You can see how I added the G+ on my sidebar right there on the top, right next to my RSS feed button.

    4) Follow the steps on configure your site for multiple authors (next part).

    Configure Your WordPress Site For Multiple Authors


    This is where that “vital” plugin comes into play. As you may probably know, WordPress removes any “rel” or html tags in the bio box, even if you attempt to create one. Reason aside, there is a workaround, by either editing your author.php file or installing a simple plugin that allows you to add anything you want in the bio box. 1) Install Allow REL= and HTML in Author Bios (WordPress repository) and activate it. The developer warns you about this plugin, which can be used inappropriately by your authors, so be sure you trust them. Once installed, activate the plugin and go to your WordPress users profile.
    2) In the users profile dashboard, you will see that  a new field has been created, the “Google Profile URL”. Insert your Google+ profile id here. This process would be the same for any other contributor or author. Do your own first and then  for your authors (if you want). Rinse and repeat.
    For other authors, you do not have to install the G+ button. This is only required for the initial setup which is to establish the relationship between G+ and yourself.
    3) Next step will be to add the “rel=author me” in the biographical information area. Note that I said rel=”author me” and not “rel=”author”. The reason for this is that WordPress creates a different page for each user and apparently the “rel=author” markup creates a problem. Adding the “me” solves this problem. After you’ve done this, do it for each author you have or ask them to do it for you.

    Just to play it safe, add the “+” sign either at the beginning or the end of the anchor text. See that I used +DiTesco. Don’t ask me why, but again, Google recommends…


    ou are done! Now it is time to verify if all this works. Google has a tool that makes this very easy so head over to Google’s Rich Snippets Testing Tool, add your URL an hit preview. If all is good you will see the green “verified” authorship markup. If you receive an error, don’t panic like I did. Go over the process again and ensure that you have not missed something. Once you are verified, users will eventually see search results that show your “photo” next to the snippet. Great way to stand out, and if people already know you, the more likely your link would be clicked ;-)


    As I said, this is the easy way that worked for me, and thanks to Ken Morico who made this possible. There are other ways to do this and if you want to try other different methods, you can try these methods from Yoast, BlindFiveYearOld or SixEstate.
    Update April 2012: This method, according to several feedback I received, works 99% of the time. If for some reason you fall under the 1% that can not make it work, please let me know by sending me an email. I’m sure we can find a way of working together that could be beneficial for both sides :) . That’s it! Let me know if this method works for you. If you have a different method that you can share with us, please let me know so I can add this to the list of ways to verify Google’s authorship markup.



    Article by

    +DiTesco is a Business Consultant, an Online Entrepreneur and founder of iBlogzone. iBlogzone's main objective is to help you achieve success in your online ventures. iBlogzone does this by providing internet users the necessary resources and tools to help you build a profitable home based business. | More About Me and my Consulting Services.

    Control Your Computer With Gestures

    Display a Retweet Button On Your Site


    With Twitter getting so much exposure, as a blogger you should already be using it to your advantage. Power of twitter is like no other because it is word of mouth advertising. To make this easier on your readers, what you can do is place a prominent retweet button, so they can retweet the article with one click. Not only just that, but you should make it the way so you can track the retweets as well. That is where tweetmeme widget comes in.
    In this tutorial we will have you create a button that will link to the text in the following format:
    RT @ Title of the Post – Link
    Add the following code in the template file of your choosing most likely single.php
    For the Large Button:
    1<script type="text/javascript">
    2tweetmeme_source = 'wpbeginner';
    3</script>
    4<script type="text/javascript" src="http://tweetmeme.com/i/scripts/button.js"> </script>
    For the Compact Button:
    1<script type='text/javascript'>
    2tweetmeme_style = "compact";
    3tweetmeme_source = 'wpbeginner';
    4</script>
    Remember to change the source to your twitter account name, this way you will not only promote your account to get more followers, but your article will be promoted as well.

    How set an Expiration Date for Your Posts


    This hack comes becomes very useful when you are running a contest because you might be posting information such as clues or hints that you don’t want to stay up for ever. Instead of manually removing the article, you can just make it expire automatically. It also works if you have a product that you are offering a discount on. You posted it on your blog, but you don’t want that discount to stay on your blog after its over. So you can remove it automatically with this code.
    All you need to do is replace your WordPress Loop with this code:

    01<?php
    02if (have_posts()) :
    03while (have_posts()) : the_post(); ?>
    04$expirationtime = get_post_custom_values('expiration');
    05if (is_array($expirationtime)) {
    06$expirestring = implode($expirationtime);
    07}
    08
    09$secondsbetween = strtotime($expirestring)-time();
    10if ( $secondsbetween > 0 ) {
    11// For example…
    12the_title();
    13the_excerpt();
    14}
    15endwhile;
    16endif;
    17?>
    Once you have done that, you can use custom fields when writing a post to set an expiration date. Make sure you select the key “expiration” and use the the following date format: mm/dd/yyyy 00:00:00
    Now this hack does not remove or unpublish the article instead it just excludes the article from being displayed in the loop.