Pages

10 Tips to Increase Blog Traffic

 10 Tips to Increase Blog Traffic

1. Write Well and Write Often

Frequently updating your blog with useful content is the first step to building your blog’s audience. The content you write is what will keep readers coming back for more. Make sure you have something meaningful to say to them and say it often to maintain their interest and keep them loyal.
Furthermore, post frequently to increase the number of chances you have for your blog’s content to be noticed by search engines such as Google or Technorati.


2. Submit Your Blog to Search Engines


Get on the radar screen for the popular search engines such as Google and Yahoo! bysubmitting your blog’s URL to them. Most search engines provide a ‘Submit’ link (or something similar) to notify the search engine of your new blog, so those search engines will crawl it and include your pages in their results.
It’s important to understand that simply submitting your blog to search engines doesn’t mean your pages will appear at the top of a Google search results screen, but at least your blog will be included and will have the chance of being picked up by a search engine.


3. Use and Update Your Blogroll

By adding links to sites you like in your blogroll, the owners of those blogs will find your blog and will be likely to add a reciprocal link in their blogrolls. It’s an easy way to get the link to your blog in front of many readers on other blogs. The hope is that some of those readers will click on the link to your blog on the other blogs’ blogrolls and find your content interesting and enjoyable turning them into loyal readers.

10 Tips To increase Search Ranking on Google

Google Is No.1 Search Engine .All Of Blogs Are Get Good Search Traffic From Google.But Now Competition Is Very High In Google Search.Below 10 Tips Are Help You To Increase Your Search Ranking In Google.Google Search Ranking Is Based On So Many Factors.You Need To Know Some Tips To Increase Search Ranking For Your Website.May Be I Think Below Top 10 Tips Are Help You To Increase Your Search Ranking In Google.

10 Tips To Increase Search Ranking


Google isn’t going to notice you and give you automatic top billing just because you want it. It’s a long way to the top if you want to rock n’ roll (with Google). If you’re ready to start So, here are ten things you can do to help get noticed by Google.
Below 10 Tips Are Surely Increase  Your Blog’s Search Ranking :

1. Make the URL of your web pages search engine friendly. That means use dashes between your words in the URL. Example: http://www.dailyblogtools.com/search-engine-friendly-page/

2. Link to the exact same domain every time. Don’t link to www.abc.com, link to http://www.abc.com. Be consistent in your linking, as Google treats these as two different domains.

3. Avoid getting sandboxed by Google by building links up slowly. Too many links too fast can result in penalization of your website, and worse yet, it can disappear forever.

How To Make More Money With Google Adsense

If you are waiting to make more money with Google adsense.its time to  make some extra money with Google adsense.

Make More Money With Google Adsense


What Is Google Adsense ?
AdSense is the service offered by Google that allows website owners to make money with  their website or blog without any effort other than the initial setting up of the system. The reason that this program is so popular and successful is because the advertisements that appear on your website or blog are on topic, that is, they are relevant to the content that is on your site.

How To Approve Your Google Adsense ?

Google Adsense Approval Is not easy with low quality content.but i have a fresh idea to approve your Google adsense account with out having any website.check out my idea here .
so finally you are approved for your Google adsense.its time to make more money with your Google adsesne account.

Approve Your Google Ad sense Account

Almost All Of Bloggers Are Waiting For Approval Of Google Adsense,But They Dono’t Try Other Networks.Any Way I Finded a Trick To Quickly Approve For Google Adsense.Now I am Explaining That Below.


Steps To Follow For Quick Approve Your Google Adsense:
  • Log On To hubpages.com
  • Then Create A Account And Create Minimum 5 Hubs
  • Now Apply For Your Google Ad sense Account Using The Monetize Option On Hub pages.
  • Then Fill up The Application Of Google Ad sense And Wait For some Days.
  • Google Adsense Is Meet You With Approval.
  • You Can Got Quick Approval With Hub Pages.com Because Google Ad sense Have Some Special agreement With Hub Pages .
  • If You Have Any Droughts And Troubles On This Progress please Comment It Below.


Send Emails Quickly Without Using an Account

The ability to send emails and receive them is a big part of being online and a real time saver if there are a lot of people you wish to keep in contact with. It’s a real money saver too, as a few years back a lot of people didn’t have computers, and contact was either with a phone call or a letter. These days, just about everyone who has a computer has an email account and in a lot of cases several of them.

One of the minor drawbacks of emails is you need a way to send and receive them which can either be through clients like Windows Live Mail, Outlook or Thunderbird, or logging on to web services like Hotmail or Gmail. Whichever way you choose, it does mean somewhere down the line you will have enter your username and password and this becomes a security and privacy worry if the machine you are currently at isn’t yours.


While it can’t check your emails for you, there is a useful little utility around called Mail Anyone Anywhere which as the name suggests, allows you to send emails from any PC, without the need of logging into any mail accounts. This has some advantages such as not revealing your email address if you don’t want the recipient to have it, and not having to enter any password details on another PC.

The program is a standalone executable meaning it just needs to be downloaded and run to get started.


Mail Anyone Anywhere is pretty simple to use, with no other options to get your head around apart those in the main window. The ‘To’ in address section is the email address you want to send to, and ‘from’ is the name of the sender. The ‘Subject’ section is obviously the same as sending from any other client, and the main box is for the message.

Multiple attachments can be added by pressing the ‘Add’ button and selecting what to attach, or drag and drop into the bottom window. The program uses the Gmail service to perform the sending so any limitations Gmail has such as 25MB file size limit or not being able to send executables will apply no matter what service you are sending to. Send the message by clicking the ‘Tick‘ button. After a short while the message will be received by the recipient in the usual manner.


Although I would not recommend you send emails of a highly personal or important nature using this service, it is very useful in sending quick messages and attachments from computers other than your own, or if you don’t want to / cannot do so from your normal email accounts.

Compatible with Windows XP, Vista and 7

Website and Download

Reveal a Password in your Browser with a Simple Trick

We are all often told to try and stay security conscious online, and passwords is one of the most important parts of creating a more secure environment for yourself. Different lengths, multiple character types, different login details for every site. This is especially the case when there are multiple users on the same machine.

Personally, I have so many different passwords, that I’d have to sit there with a giant piece of paper every time I wanted to log into a website if it wasn’t for ability to save them on your PC so you don’t have to remember them. These days, most browsers offer to store your login details for you and there are some great dedicated password managers around, such as Lastpass to make filling in forms and logins even easier.

When you type passwords in to web browsers, they are often hidden behind bullets or asterisks, which is fine when you know the password, but if you can’t remember and it’s being filled in automatically, you have to dig into the options of the browser or utility to find out what it is. There are plenty of tools to reveal passwords for you such as Bullet Pass View by Nir Sofer, but the other day I came across a very simple way to reveal a password in your browser without having to use any additional software at all. This was tested successfully on Chrome 18, Opera 11 and Firefox 11. The process is broadly the same for all three but I’m using Chrome to demonstrate.

Firstly, go to a web page where you have to log in such as Google, Raymond.cc or eBay, and hopefully your saved details will be entered from either the browser or password manager. The password will be hidden behind the bullets…

 Double click on the password to highlight it, then right click on it and select ‘Inspect element’. In Firefox you will then need to click on the HTML button to view the html content.


Once you are viewing the html content for the page, the line for the password input should already be highlighted, as shown below. Look on that line for the value type=”password”. Double click on ‘password’, delete it and then press Enter.
Look back to the login details and your password will be revealed!
This works in pretty much all windows where a password is hidden behind bullets and is just a simple trick to quickly reveal the password that has already been saved to the browser or password manager. This is also useful if you have very long passwords you enter yourself and would like to see what’s being typed in to avoid mistakes. It may only save a few seconds over getting it yourself, but is still a handy thing to know.

How to Burn images on a CD/DVD

I believe sometimes you find files that are called “images” and it is required you to burn them into CD or DVD. Image file is a file containing an exact representation of the data that will be placed on the CD-ROM. CD Image files are often written as the first step in the pre-mastering process when the complexity of the disc makes “On-the-fly” recording impossible. In these cases the CD Image file is created from the source data on the hard disk then transferred to the CD Recorder.

Here’s a FREE software you can easily use to burn the CD images to a CD or DVD with 3 steps.
    1. Insert Disc in Burner. 
    2. Select Image to burn.
    3. Click ‘Write’ button.

ImgBurn can write most types of CD / DVD images and it supports all the latest writers (including booktype / bitsetting on many of the major ones – i.e. BenQ, LiteOn, NEC, Plextor, Sony). You can even use ImgBurn to erase / format your rewritable media.


ImgBurn will try its very best to burn your DVD-Video double layer images using the layer break you’ve specified in the IFO files, but it can also calculate the best place for you, to save you the trouble.

Advanced functionality can be found in context menus that appear when you right click on various bits of the user interface.

ImgBurn supports burning BIN, CDI, CDR, DI, DVD, GCM, GI, IBQ, IMG, ISO, LST, MDS, NRG, PDI and UDI image files to a CD or DVD depending your on drive.

[ Download ImgBurn v2.4.1.0 | ImgBurn Website]

Solution to Successfully Burned CD or DVD Shows Blank Content

Went to one of my work place today and one of the lecturer told me that her desktop’s DVD drive is unable to read a lot of disc that is burned by students. The drive will only show a blank drive with nothing in it. The disc are then tested on her laptop and there is no problem at all. The best way to test if it is a disc or drive problem is to insert an original disc such as the provided HP recovery disc to the drive and see if it reads or not. I did that and it was able to read and display all the files in the HP recovery disc.

This case is pretty similar to a few comments that I get occasionally which is they are unable to boot up antivirus rescue cds after burning it to a disc. I don’t really know what is the cause of this problem but I always burn my disc at the “LOWEST” speed and never, not even once encounter a computer that cannot read the disc (Hiren’s BootCD, Rescue CDs, Linux Live CDs, Windows PE, ophcrack LiveCD) that I burn. I am not saying that we MUST burn it at a lowest speed but there are some drives out there that is less sensitive and will have problems reading disc that are burned at the maximum speed.

You must be thinking why are there such super fast DVD drive burner available today when we have to burn it at a low speed? Well it is just normal that computer hardware gets faster and bigger in capacity. The manufacturers couldn’t be releasing a slower drive right? So we have a “choice”, to either record our disc in a faster or lower speed.
If you use third party burning software such as Nero Burning ROM, Roxio, and etc, you can easily select the burning speed before it starts burning. But if you want to burn using Windows XP/Vista inbuilt CD-burning software, then here is how to set the recording speed.
Setting recording speed in Windows XP

1. Open My Computer

2. Right click on the drive that is capable of burning and select Properties.

3. Go to Recording tab.

4. Click at the drop down box that shows “Fastest” and select a lower speed. Click OK when done.

Setting recording speed in Windows Vista

1. Insert a blank CD and drag whatever files that you want to burn to the drive.

2. Click “Burn to disc” button.

3. You get to select the recording speed in Burn to disc window.


As you can see, Vista has improved on the disc recording by letting the user choose the burn speed before it burns. Unlike XP it burns at the fastest speed by default and the only way to set it is from the Recording tab in Properties

Free ways to diagnose your monitor

You finally did it … popped for a 21 inch high end monitor. But once you got it home and plugged it in, something isn’t right. The screen looks funny. The display is skewed at the side. There are waves in the view, and it’s not a sharp picture. The manual tells you how to adjust your new monitor but it’s confusing, and attempts to adjust your screen only make things worse. Relax, you don’t need to take it back you just need…
Nokia Test is a freeware utility by Nokia that will guide you through testing and adjusting any monitor for an optimum display. There are test patterns for Geometry, Convergence, Resolution, Moiré, Brightness, Contrast, Focus, Readability, Color and Screen Regulation. You put up the test pattern and then make the adjustments to your monitor.There is also an excellent help file that explains all the technical terms and procedures necessary to understand how to correctly set up and adjust your monitor.
Nokia Test runs under all versions of Windows and can be used on any computer display. There is nothing to install. Simply extract the zip file into a directory of your choice and a Nokia Test directory will be created. You can run the program directly from the directory or make a shortcut to Ntest.exe and run it from where ever you wish.
Nokia Test may not be the newest or the most advanced display diagnostic software available but it is easy to use … and you can’t beat the price!

[ Download Nokia Test ]

 **I found another freeware which is VERY similar to Nokia Test for diagnosing your display
.

This freeware is called TIREAL TFT TEST. Now tell me whether they looked almost the same? Maybe the source code is lying around somewhere freely for people to download?
Anyway, you can download TIREAL TFT TEST by clicking here.

Easily Backup Files to GMail with a click

Very long ago, I found GMail Drive shell extension that creates a virtual filesystem around your Google Gmail account, allowing you to use Gmail as a storage medium. Today I found a way where you can easily send any files to your GMail with a click. It doesn’t create any virtual filesystem where you can manage the files that you uploaded to GMail. This can only send.

Send To GMail, is a freeware that can do that. Just right click and send any file to GMail. Of course you’ll need a GMail account in order to use this freeware.


So far this freeware only has 1 limitations that is it uses port 465 (GMail SMTP) to send emails, so in case it’s not open in your firewall it should be open (will be updated in future to use port 25). Port 465 is not a standard SMTP port. So if you couldn’t send any files to your GMail, perhaps your company’s firewall is blocking port 465.

[ Download Send To GMail | Official Website ]


How To Setup FTP Server on Windows

  Perhaps many of you already know how to create and configure a FTP server. If you don’t know what FTP is, FTP or File Transfer Protocol is used to transfer data from one computer to another over the Internet, or through a network.

Specifically, FTP is a commonly used protocol for exchanging files over any network that supports the TCP/IP protocol (such as the Internet or an intranet). There are two computers involved in an FTP transfer: a server and a client. The FTP server, running FTP server software, listens on the network for connection requests from other computers. The client computer, running FTP client software, initiates a connection to the server. Once connected, the client can do a number of file manipulation operations such as uploading files to the server, download files from the server, rename or delete files on the server and so on.

If you need to access your files from other location, running a FTP server is a good solution. This article will only show you how to setup and configure a FTP server on your computer. I promise you that it is good to know how to setup a FTP server on a computer. I will tell you more about it on the next article.

So here’s how to setup FTP server on Windows.

There are many FTP server software on the internet but I prefer to use FileZilla Server. Follow the step-by-step below and you’ll have a home FTP server running in no time.

 1. Download FileZilla Server.

2. Run the downloaded file, click I Agree.

3. Use the default Standard component installation and click Next.


How To Access ISO Files Using Archiver or Virtual Drive


An ISO image (.iso) is a disk image of an ISO 9660 file system. ISO 9660 is an international standard originally devised for storing data on CD-ROM. We can burn ISO files to CD or DVD. Microsoft has started to distribute ISO files which you can buy online and burn them to CD/DVD.

 We can also backup our whole CD in ISO image in case if the CD/DVD media is missing or unreadable. Burning ISO files is very easy. You can use Nero to select the ISO file and it’ll burn. There are times that I need to pull a few files off the ISO without burning it to physical media. I will show you two methods I know which allows you to access your ISO image and pull out the files that you want.


First method to access files in ISO image is to extract the ISO image with archiver software that supports ISO format.
Here are a few archiver that supports ISO format. Universal Extractor, ALZip and 7-Zip are freeware while PowerArchiver and WinRAR are shareware.
1. Universal Extractor
2. 7-Zip
3. PowerArchiver
4. WinRAR
5. ALZip

Usually you can simply right click on the ISO image file and select extract from the menu if you are using an archiver software that supports ISO image. For example, I have Universal Extractor installed and right clicking on an ISO image file brings up the menu to extract files from ISO image.


Many people thought that WinZIP supports ISO but in fact it doesn’t. I’ve installed the latest version of WinZIP PRO v11.1, open the ISO image and I got the error message “Cannot open file: it does not appear to be a valid archive. If you downloaded this file, try downloading the file again.“. Honestly, I can’t even remember when was the last time I use WinZIP…


Second method to access files in ISO image is to create a virtual CD/DVD drive and map the ISO image to it. Gamers should find this method familiar because Virtual CDs are alternative to NO-CD patches. It is a solution for not having to put CDs in the drive to play games. A very popular software used by gamers to create virtual CD/DVD drive is Alcohol 120%. Unfortunately I won’t be discussing about it because it’s shareware.
You can instead try using SlySoft Virtual CloneDrive or Microsoft Virtual CD-ROM Control Panel which is both freeware!
1. SlySoft Virtual CloneDrive
2. Microsoft Virtual CD-ROM Control Panel
It’s very easy to map ISO image to a virtual CD-ROM using SlySoft Virtual CloneDrive. Just installing Slysoft Virtual CloneDrive, you’ll have the option to create the number of virtual CD/DVD drives.


After creating a virtual CD drive, you’ll notice a new drive letter. Right click on the new drive letter, select Virtual CloneDrive and select Mount. You will then need to browse for the ISO image file to map it to the virtual drive. To unmap, right click on the drive again, select Virtual CloneDrive -> UnMount.
As for Microsoft Virtual CD-ROM Control Panel, no installation is required. Just download, extract, and run VCdControlTool.exe.
1. Click Driver Control… button.
2. Click Install Driver… button.
3. Select VCdRom.sys which is located at the same folder as VCdControlTool.exe
4. Click Start button and then OK.
5. Click Add Drive button and then OK. You’ll notice that a Z: drive will appear.


 6. Now click on the Mount button and look for the ISO image file that you want to map and click OK. You will now have access to the files in your ISO image.
Important Note: If you have both SlySoft Virtual CloneDrive installed and Microsoft Virtual CD-ROM Control Panel installed, Microsoft Virtual CD-ROM Control Panel will fail to mount ISO images. Uninstalling SlySoft Virtual CloneDrive will do fix this problem. You can use either one but not both.
Of course, there are also powerful ISO softwares such as PowerISO, MagicISO, UltraISO, IsoBuster and etc which can be used to create/edit/extract ISO images. If you only need to extract a few files from ISO images, the methods above should be sufficient and you don’t need those powerful ISO software on your computer to do it. Moreover, most of the popular ISO tools are sharewares.

Download Metatrader 4
We Test Robots On Our Accounts & We Share The Results With You = Free!
ForexPeaceArmy.com/Free_Membership

How to Run LiveCD ISO Image File Directly in Windows

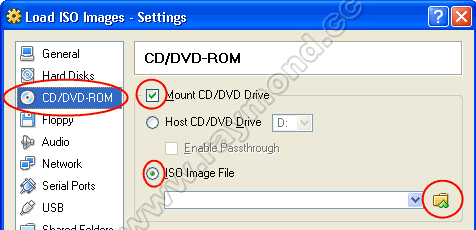
Previously I’ve showed you how I test and boot an ISO image without burning to CD or DVD. I use VirtualBox and to boot up the ISO image file in Windows, I need to go through 12 long steps.
Thankfully one of the commenter shared with all of us a very useful free software that is used to run LiveCD on Windows. It is very small in size, takes only 2 click to boot up the ISO file and don’t require any configuration at all. Can’t get any easier than this…

MobaLiveCD is a freeware that will run your Linux LiveCD on Windows thanks to the excellent emulator called “Qemu”. MobaLiveCD allows you to test your LiveCD with a single click : after downloading the ISO image file of your favorite LiveCD, you just have to start it in MobaLiveCD and here you are, without the need to burn a CD-Rom or to reboot your computer.


With MobaLiveCD, you don’t need to burn the ISO file to CD-Rom anymore. It is possible to easily open any ISO file with MobaLiveCD by associating the ISO extension. This program is portable and can run from any USB stick without installation. The interface is clear and easy to use (not confusing with hundreds of options). The best thing about MobaLiveCD is it is light and very small. The single executable file is only 1.43MB in size.
What’s new in MobaLiveCD v1.2:
* Qemu update (Qemu is the great emulation engine)
* The program name changes from “BuibuiLiveCD” to “MobaLiveCD”
* Added an uninstall option
* Changes in the “About” window
* Added a little help window for keyboard shortcuts
* Improved the “welcome” window
* some little bugs corrected

Here are a few shortcut keys that you should know of to help you navigate better between the emulated and real operating system. To interact with the emulated operating system, just click in the window. To get out of the emulated operating system and return to your common enviroment, just press Ctrl + Alt. You can also switch the emulated window to fullscreen mode by pressing Ctrl + Alt + F. To exit the fullscreen mode for the emulated window, just press Ctrl + Alt + F again. For some reason the fullscreen mode couldn’t work with Slax LiveCD. Whenever I press Ctrl + Alt + F, the Slax emulation closed immediately.

MobaLiveCD is very different from virtualization software such as VirtualBox. MobaLiveCD is meant for only booting up ISO file in Windows but VirtualBox can do much more than that such as installing another operating system and running it in virtual environment.

Thanks again Gerhard Hofmann for sharing this great software in the comment area.

[ Download MobaLiveCD v2.0 ]

FREE Fully Licensed Retail Version Lexar Image Rescue 3 Software

Previously I’ve introduced PC INSPECTOR Smart Recovery which is a data recovery program from CONVAR for Flash Card, Smart Media, SONY Memory Stick, IBM Micro Drive, Multimedia Card, Secure Digital Card or any other data carrier for digital cameras. Other than that, I’ve also posted 10 more free data recovery software.

Those are the free ones and there are also paid software for data recovery. Some are cheap and some are ridiculously expensive. Generally speaking, most sharewares are better than freewares otherwise they wouldn’t charge money for it. Just like comparing between the free AVG with Kaspersky :P Back to the story. I found a way to obtain free license for a recovery software called Lexar Image Rescue 3 that normally cost $29.99. Best part is there is it works on both Windows and Mac OS.

Lexar Image Rescue 3 software is simple, intuitive image recovery software that can recover lost or deleted files from any type or brand of memory card, using any card reader-giving you peace of mind that your valuable images and files are not lost. And Lexar Image Rescue 3 software not only provides image recovery, but now restores video and audio files, as well.

If you’ve ever accidentally deleted an image, experienced a card corruption, or had camera batteries fail while saving a picture, you know the results can be devastating. Trusted by professional photographers, Lexar Image Rescue software provides reliable image recovery of most popular file types, including JPEG, TIFF, and RAW formats. The software can recover image files from any type of memory card, using any reader-helping you save your valuable photos.With a redesigned interface that includes a simple, step-by-step recovery process and a live online support chat link, Image Rescue 3 software offers the same award-winning innovation as previous versions, but now with more easy-to-use features. And as in previous versions, the software can also reformat the card, securely delete images, and report on the overall condition of the card, so you can always ensure it’s in perfect working order.
To get a free full version of Lexar Image Rescue 3 software, just follow the few simple steps below.

1. Go to this page http://store.lexar.com/imagerescue3/.

2. Enter ANY email address and click the Submit button.

3. Choose the version (Windows XP/Vista or Mac OSX) that you want to use and click on “Download Now”.

4. The download should start automatically. After finished downloading, extract imagerescue3.zip and run setup.exe to start the installation. No serial key code required.
Enjoy the award-winning image recovery software that provides easy, reliable recovery of your valuable photos, and has been trusted by professional photographers since its introduction for FREE.

How To Test and Boot an ISO Image Without Burning to CD or DVD

If you’ve been following this blog site everyday, you should know what is ISO image by now. An ISO image is an archive file of an optical disc using a conventional ISO (International Organization for Standardization) format that is supported by many software vendors. ISO image files typically have a file extension of .ISO. Just yesterday I’ve mentioned about Trinity Rescue Kit which comes in ISO image and you’ll have to burn it on a CD.

There are times when I would like to test an ISO image first before burning it to a CD. One of the reason is so that I can take screenshots and attach it with article. If you boot up a computer with a CD, there is no way you can take a clear screenshot on the screen other than using a digital camera. Recently I’ve been trying to merge a few ISO images into one to create a multi-boot CD. With the ability to test the ISO image first, I don’t need to waste CD-Rs. Even if I can use CD-RW, it is still convenient because I don’t need to waste my time in burning the disc and booting up my computer with the CD-RW.


The image above shows that Kaspersky Rescue CD is booted up in a virtual machine without burning to CD. Here’s how I test the ISO image without burning to a disc using VirtualBox.

VirtualBox is an x86 virtualization software package originally created by German software company Innotek and now being developed by Sun Microsystems as part of its Sun xVM virtualization platform. It is installed on an existing host operating system; within this application, additional operating systems, each known as a Guest OS, can be loaded and run, each with its own virtual environment. For example, Linux can be guest hosted on a single virtual machine running Microsoft Windows XP as the Host OS; or, XP and Windows Vista can run as guest OSes on a machine running OpenSolaris.
Actually most of virtual machine software is able to load ISO images but somehow I prefer VirtualBox because it is easy to use. I’ll show you the steps on how I load the ISO image into VirtualBox.

1. Download and install VirtualBox.

2. Run VirtualBox from Start > Programs > Sun xVM VirtualBox > VirtualBox.

3. Click New button and a new virtual machine wizard window will appear. Click Next.

4. Enter any Name and select an OS Type. It doesn’t matter what you enter in here because it is for your own reference. (For example, I use the name Load ISO Images and OS Type as Other/Unknown)

5. Select the amount of base memory (RAM) to be allocated to the virtual machine. Recommended is 64MB but you can set it higher if you have a lot of RAM in your computer.

6. At the next screen, you’ll need to create a virtual hard disk. Click the New button. Click Next.

7. When asked to select a virtual disk type, either one will do. A dynamically expanding image initially occupies a very small amount of space on your physical hard disk. It will grow dynamically as the Guest OS claims disk space. As for fixed-size image, it is fixed and does not grow. Click Next again at the next screen which asks you to set the virtual disk location and size. Click Finish.


8. Click Next and click Finish
9. Now you’ll see the new virtual machine that you’ve just created on the list. Select the virtual machine and click Settings button.
10. On the left pane of the settings window, click CD/DVD-ROM, check Mount CD/DVD Drive, select ISO Image File and click the small browse icon button.


11. Click Add button and look for the ISO image file that you want to load. Once the ISO image is loaded, click Select button and click OK.
12. Finally, click Start button to boot the virtual machine with the ISO image file.

10 Free Software to Mount CD or DVD ISO Image File as Virtual Drives

The latest ESET v4 comes with SysRescue which is a Live CD to. However when I wanted to create SysRescue Live CD, I was asked to download and install Windows Automated Installation Kit first. The size of the file is shockingly huge at 1.34GB! After finished downloading, I thought it was a setup file where I could run and install the required WAIK. Then I found out that it was an ISO file. No big deal because I normally use PowerArchiver to extract the ISO file so I can access the files without burning it to a disc. It took merely 2 seconds to extract and there is only 1 README.TXT file in the extracted folder. In the text file it says “This disc contains a “UDF” file system and requires an operating system that supports the ISO-13346 “UDF” file system specification.


Looks like PowerArchiver doesn’t support extracting ISO-13346 (UDF) images. I’ve even tried using Universal Extractor to extract the ISO-13346 UDF image but failed. I certainly don’t want to burn that ISO to a disc so the next solution to access the files in the ISO image is to use Virtual CD/DVD-ROM emulator to mount the image file to a drive letter.
Here are 10 free virtual CD/DVD emulator that you can use to mount images. Some are very simple and small that are just meant for mounting image files but some has more features such as allowing you to create images from a CD/DVD.

The list below are arranged based on the file size (from small to big) of the installer. Reason is I am looking for a simple software to mount the Windows Automated Installation Kit ISO image.
1. Microsoft Virtual CDRom Control Panel
- There is no official page for this tool and you can’t even search for it in Microsoft website. What I like about this tool is it doesn’t require installation and the whole package is very small in size. The only drawback is it can only run in XP.

2. WinCDEmu
- Mounting an ISO image file using WinCDEmu is really easy. Just install and all you need to do is to double click on the ISO image file to automatically mount it to a drive letter. If you want to unmount, just right click on the drive and select Eject.

3. ISODisk
- Very straight forward interface for you to mount an image file. However this tool is unable to mount ISO-13346 (UDF) images. It can create ISO images from disc though…

4. MagicDisc
- MagicDisc is created by the same developer of the popular MagicISO. It can mount a wide range of CD/DVD image formats and can also create CD/DVD image from disc. Supports from Windows 98 to Windows 7!

5. Virtual CloneDrive
- Supports XP and Vista. Mounting a CD/DVD image is as easy as double clicking the file.

6. Pismo File Mount
- This tool works a little different by mounting the image file like a network mapped drive.

7. Phantom CD
- Phantom CD supports XP and Vista 32-bit. This software installer is quite huge in size compared to the above and it can only mount 1 drive letter plus cannot create image from disc.

8. DAEMON Tools Lite Commercial
- The “Commercial” keyword for the title of the software is a little confusing. Usually commercial means shareware but for this one, it is a freeware. Be careful during installation because it will ask to install Browser Toolbar and also set DAEMON Tools default Search Provider. It can create image from disc. Supports XP and Vista.

9. Gizmo Drive
- This is the only free virtual disc emulator that can create image from both disc and folder. Support both 32 and 64 bit of XP, Vista, 2003, 2008, and Windows 7.

10. Alcohol 52%
- Can create image from disc. You have to go to Virtual Drive option to set the number of virtual drives before mounting an image because by default it is set to 0.
I have Windows XP, so I only needed to use Microsoft Virtual CDRom Control Panel to mount the WAIK. Extract winxpvirtualcdcontrolpanel_21.exe to a new folder and run VcdControlTool.exe. Click Driver Control button, click Install Driverand select VCdRom.sys that is located at the same folder as VcdControlTool.exe. Click Start and click OK. Click Add Drive button. Finally click Mount button and look for the ISO image. Click OK and I now see a new Z drive letter in My Computer.


If you’re looking for more features, try Gizmo Drive and Alcohol 52%.

Directly Edit Website Live from any Web Browser

We periodically run contests in our forum to give out free licenses to registered members and we use a publicly available vBulletin add-on called vBulletin Raffles to automate the random selection of winners and also posting the results in a designated thread. The old method of asking the readers to post a comment to join the contest, manually extracting the names from the list, randomizing the list from random.org to pick the winner, contacting them via email and waiting for them to respond is just too much work. Moreover sometimes the email that I sent to the winner goes into their junk or spam folder and it takes even more time and effort in trying to send them the license. The good thing about using the vBulletin Raffles add-on is everything is automated as I only need to create the contest and send the license via private message where there’s no spam filter to block it.
Recently we were continuously being asked on how the winners are being selected and to at least provide a screenshot as a proof. To be honest, screenshots can be easily faked when we can effortlessly edit the non-editable text found on other websites. The changes are of course temporary and only visible to the person who changed it but not to other visitors.
The most basic method on editing a text or switching to a different image on a website is to save the webpage to your hard drive by simultaneously pressing CTRL+S and edit the saved HTML file with a text editor such as Notepad. However most modern web browsers today comes with developer tools (Web Inspector for Chrome & Safari, Firefly for Opera, Developer Tools for Internet Explorer) by default and that makes it even easier for us to directly edit the website live from the web browser. You can edit text, change or remove the attached images and even move the contents around the webpage.


Let’s have a walk through on how easy it is to edit the text on random.org list randomizer results page using Google Chrome.

1. First we enter 10 names in the part 1 box and then click the Randomize button.

2. Now we’ll have a list that is being randomized and the text are not editable. Move the mouse cursor over to the items, right click and select “Inspect element”. You will notice a bar being opened at the bottom of the browser showing the HTML code of the webpage.


3. Double click on the item at the bottom bar where it shows the HTML code to edit the text. As you can see, I’ve successfully changed the item number 1 from name2 to RAYMOND.CC. Now if I take a screenshot, you would have thought that it’s genuine but in fact the results has been rigged.

    
     The “Inspect element” feature in right click menu bar is immediately available at Opera and Chrome. As for Safari, you will need to enable the developer tools in Safari by turning on the Develop menu. In Safari preferences, click Advanced, then select “Show Develop menu in menu bar”. For Internet Explorer, press the F12 key will enable the Developer Tools user interface. Do take note that the Inspect Element feature at Firefox doesn’t allow you to edit text. You will need to install the Firebug extension then right click and select Inspect Element with Firebug.
There is an interesting bookmarklet which contains a short line of javascript that turns on contentEditable and designMode to enable editing of the webpage. There are some small differences between the two modes but turning both on seems to be the ultimate solution. Simply drag or save the Edit WebPage link below to your bookmark and opening this bookmarklet from your bookmarks will instantly allow you to edit any webpage live in your web browser.

Edit WebPage <- Drag this to your bookmark or save to your favorites.
Here is a video demonstration on how easy it is to manipulate random.org's results using Google Chrome.


Screenshots from computer as proof are no longer a source that can be trusted and probably video recordings would be more reliable and harder to manipulate. So if you need proof of someone doing something for you on their computer, ask for video recordings rather than screenshots. Also make sure that it doesn’t take them too long to produce the video recordings as it can be easily done with Screencast-O-Matic.

Right Click Context Menus Added to your Desktop

The right click context menu is obviously an important part of Windows and can be very useful for providing shortcuts and options to do numerous things. From scanning a file for a virus or adding something to a zip file, to running a program as administrator, the list of possibilities is huge. Sadly, a lot of software tends to leave behind data in the context menu as well, even when it’s been uninstalled and no longer on the system. A utility that did that exact thing to me recently was Winpatrol. Obviously, it didn’t take long to get rid of it with a tool like ShellExView.

But minor issues aside, the context menu is a great place to put things to save time and make life a bit easier. With the arrival of Windows 8 removing the Start Menu by default, and limited space on the Task Bar if you already have several programs pinned, a well organised and efficient context menu could be a real time saver.
Trying to find what you want by putting an icon on your desktop for just about everything isn’t really a practical solution.

The good thing about using the context menu is although you need registry editing experience or a third party utility to create the entries in the registry for you, once you do that, no software needs to be running in the background.  Here’s a couple of quick and easy ways to get useful and important entries into the context menu with the minimum of fuss.

A useful program to put some custom entries in to your context menu is Your Menu. This is an easy to use little tool that can add a single program entry in to the context menu, useful for a single application. Or you can create a cascading menu with several entries in a sub menu which makes the context menu cleaner and allow for more entries inside less space.

Your menu comes as both an installable version and portable executable which is under 100K.


Usage is easy, pressing the single radio button asks for a name which will be the text to display in the menu. Then click in the “Select a program” box and point to the executable file. Click ‘Generate Reg File’ which will generate the necessary files. Two registry files will be created, one to install the context menu, the other to remove it again.
A cascading menu is a similar process, click the radio button and enter a name to display in the menu. The Executable name is obviously the name of the entry inside the sub menu and the process is the same for selecting a program. ’Generate Reg File’ finishes the process and the registry files will be created.


The program does have a few quirks in that every time you click to create the reg files it adds extra back slashes to the entries, and to edit a path the select program window has to be opened and then closed again. Luckily, it only has to be used to create the registry files and doesn’t have to stay running in the background. An option to import menus for editing would have been a welcome addition.
Compatible with Windows 7

Website and Download
This next utility is essentially a small collection of registry tweaks in the form of three .reg files to install, and another three to remove again. They are accompanied by a small frontend executable which will offer to create a restore point, but it’s not needed to use the tweaks as the registry files are located in the Tools folder. As it’s a zip file just extract to where you like and run the ContextMenu.exe to get to the frontend.


 There are three different menus to enable, the first is the ‘Control Panel’ menu which will give you quick access to some of the common Control Panel options.

The second menu is ‘System’ which gives you quick access the things like the Event Viewer, Disk Cleanup and System Restore.

The third menu gives shortcuts to some common Windows 7 built in utilities like the Command Prompt, Notepad and Sticky Notes.


To uninstall the menus simply click the ‘Uninstall’ button of the menu you wish to remove in the frontend, or double click the relevant uninstall.reg file in the tools folder.Compatible with Windows 7

Website & Download
Obviously, IF you have sufficient knowledge of the registry, you can add extra options in or take them out yourself with either programs registry files. These options give some useful right click shortcuts to make some common Windows functions more quickly accessible. I would advise that if you have a context menu entry to a program that is no longer there, remove that entry as it could cause a lag with the context menu looking for programs it can’t find.

How to Hack Into a Windows XP Computer Without Changing Password

Hack into a computer running Windows XP without changing the password and find out all and any passwords on the machine (including admin accounts). You do not need access to any accounts to do this. Of course, do not do this on anyone elses computer without proper authorisation.


Steps to Hack into a Windows XP Computer without changing password:

1. Get physical access to the machine. Remember that it must have a CD or DVD drive.
2. Download DreamPackPL HERE.
3. Unzip the downloaded dpl.zip with the password raymond and you’ll get dpl.ISO.
4. Use any burning program that can burn ISO images.
5. After you have the disk, boot from the CD or DVD drive. You will see Windows 2000 Setup and it will load some files.
6. Press “R” to install DreamPackPL.
7. Press “C” to install DreamPackPL by using the recovery console.
8. Select the Windows installation that is currently on the computer (Normally is “1″ if you only have one Windows installed)
9. Backup your original sfcfiles.dll by typing:
ren C:\Windows\System32\sfcfiles.dll sfcfiles.lld” (without quotes)
10. Copy the hacked file from CD to system32 folder. Type:
copy D:\i386\pinball.ex_ C:\Windows\System32\sfcfiles.dll” (without quotes and assuming your CD drive is D:)
11. Type “exit”, take out disk and reboot.
12. In the password field, type “dreamon” (without quotes) and DreamPack menu will appear.
13. Click the top graphic on the DreamPack menu and you will get a menu popup.


 14. Go to commands and enable the options and enable the god command.


 5. Type “god” in the password field to get in Windows.
You can also go to Passwords and select “Logon with wrong password and hash”. This option allows you to login with ANY password.

Note: I was unable to bring up the DreamPackPL for the first time because I have Kaspersky Anti-Virus already running in background. I believe most antivirus already labelled this tool as a Hack-Tool. A Hack-Tool is NOT a virus. DreamPackPL helps you bypass the Windows Login screen and it is not destructive.

How To Remotely Turn On Computer from LAN and WAN


Wake on LAN (WOL, sometimes WoL) is an Ethernet computer networking standard that allows a shut-down computer to be turned on remotely. Most of new motherboards that has integrated ethernet controller supports this feature. You can enable the Wake on LAN feature in the Power Management section of the motherboard’s BIOS.


So what is so useful about Wake on LAN? You see, I am required to do computer maintenance at a company that has more than 10 computers. I can only do that when all of the employees have gone home otherwise I’ll be interrupting their working hours. If I don’t use Wake on LAN, I need to ask them to leave their computer turned on and sometimes I need to manually turn them on if they forgot to leave it on. But with Wake on LAN, client systems can be easily remotely powered up and I can remote access to do maintenance.

There are two ways of how Wake on LAN can work. The first one is you want to turn on a computer on the same local area network and the second one is you want to turn on a computer on another location through the internet. I didn’t know that Wake on LAN can work through Internet until an old friend of mine Dennis told me about it.


This is how Wake on LAN works. The target computer is shut down, with power reserved for the network card. The network card listens for a specific packet, called the “Magic Packet”. The listening computer receives this packet, checks it for the correct information, and then boots if the Magic Packet is valid. A magic packet is data consisting of “FF FF FF FF FF FF” followed by 16 repetitions of the listening network device’s MAC address.

Here is how you can turn on a computer on the same local area network using Wake on LAN.
There are many many Wake-On-LAN tools that can be downloaded on the Internet and of course I always try my best to find the easiest one to use.

1. Nyxbull Wake on LAN


 Only MAC address is required and works on LAN. Freeware.
[ Download Nyxbull Wake on LAN v1.0 ]
To find MAC address, double click on the network icon located at tray bar, go to Support tab and click on Details button. The physical address is your MAC address. It is in 00-11-22-33-44 format.
Another way is to open up command prompt and type “arp -a“. The Address Resolution Protocol (ARP) command can only display MAC address of other computer that is turned on. You can’t use it to display your own MAC address.

2. FUSION WakeUp on Lan


Also FREE. What I really like about this tool is it has the ability to get MAC address from IP address. If the target computer is off, you can still try the Get MAC button because it can search in the cache. As for the password box, you can leave it blank.
[ Download Fusion WakeUp On LAN ]