Pages

How To Test and Boot an ISO Image Without Burning to CD or DVD

If you’ve been following this blog site everyday, you should know what is ISO image by now. An ISO image is an archive file of an optical disc using a conventional ISO (International Organization for Standardization) format that is supported by many software vendors. ISO image files typically have a file extension of .ISO. Just yesterday I’ve mentioned about Trinity Rescue Kit which comes in ISO image and you’ll have to burn it on a CD.

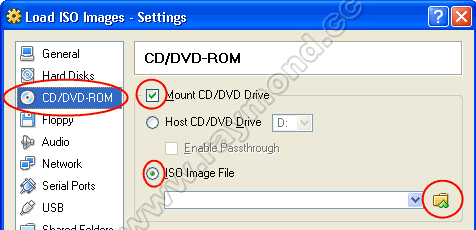
There are times when I would like to test an ISO image first before burning it to a CD. One of the reason is so that I can take screenshots and attach it with article. If you boot up a computer with a CD, there is no way you can take a clear screenshot on the screen other than using a digital camera. Recently I’ve been trying to merge a few ISO images into one to create a multi-boot CD. With the ability to test the ISO image first, I don’t need to waste CD-Rs. Even if I can use CD-RW, it is still convenient because I don’t need to waste my time in burning the disc and booting up my computer with the CD-RW.


The image above shows that Kaspersky Rescue CD is booted up in a virtual machine without burning to CD. Here’s how I test the ISO image without burning to a disc using VirtualBox.

VirtualBox is an x86 virtualization software package originally created by German software company Innotek and now being developed by Sun Microsystems as part of its Sun xVM virtualization platform. It is installed on an existing host operating system; within this application, additional operating systems, each known as a Guest OS, can be loaded and run, each with its own virtual environment. For example, Linux can be guest hosted on a single virtual machine running Microsoft Windows XP as the Host OS; or, XP and Windows Vista can run as guest OSes on a machine running OpenSolaris.
Actually most of virtual machine software is able to load ISO images but somehow I prefer VirtualBox because it is easy to use. I’ll show you the steps on how I load the ISO image into VirtualBox.

1. Download and install VirtualBox.

2. Run VirtualBox from Start > Programs > Sun xVM VirtualBox > VirtualBox.

3. Click New button and a new virtual machine wizard window will appear. Click Next.

4. Enter any Name and select an OS Type. It doesn’t matter what you enter in here because it is for your own reference. (For example, I use the name Load ISO Images and OS Type as Other/Unknown)

5. Select the amount of base memory (RAM) to be allocated to the virtual machine. Recommended is 64MB but you can set it higher if you have a lot of RAM in your computer.

6. At the next screen, you’ll need to create a virtual hard disk. Click the New button. Click Next.

7. When asked to select a virtual disk type, either one will do. A dynamically expanding image initially occupies a very small amount of space on your physical hard disk. It will grow dynamically as the Guest OS claims disk space. As for fixed-size image, it is fixed and does not grow. Click Next again at the next screen which asks you to set the virtual disk location and size. Click Finish.


8. Click Next and click Finish
9. Now you’ll see the new virtual machine that you’ve just created on the list. Select the virtual machine and click Settings button.
10. On the left pane of the settings window, click CD/DVD-ROM, check Mount CD/DVD Drive, select ISO Image File and click the small browse icon button.


11. Click Add button and look for the ISO image file that you want to load. Once the ISO image is loaded, click Select button and click OK.
12. Finally, click Start button to boot the virtual machine with the ISO image file.

No comments:

Post a Comment